
For the complete documentation index, see llms.txt.The Spacecraft page lets you manage your satellite fleet. Each spacecraft is organised by fidelity tier — identifiers, the cannonball model (bulk mass plus single drag and SRP area coefficients), advanced geometry (bus dimensions, panel definition, and mounted components), and a Danger Zone for archive and restore actions. Route:
/spacecraft
Catalogue identifiers
In Identifiers, search the spacecraft catalogue by name, NORAD number or COSPAR designator and select your spacecraft. VALAR fills both catalogue identifiers; your display name remains editable. Catalogue selection does not require available orbital elements. For a planned spacecraft or one awaiting catalogue assignment, check This spacecraft is not yet catalogued. This disables lookup and leaves both identifiers empty. You can later edit Identifiers, uncheck the option and select the catalogue entry while retaining the spacecraft’s configuration and history. Changes to an existing spacecraft take effect when you save. Existing spacecraft are linked automatically where their identifiers unambiguously match the catalogue during migration. Unresolved records keep their current identifiers and remain usable; missing identifiers alone do not mark them as not yet catalogued. Lookup shows the source catalogue’s update time and indicates when freshness cannot be verified. VALAR checks for new publications hourly and retains the last valid catalogue during provider outages.Page Layout
The page shows a single spacecraft at a time. Use the spacecraft selector at the top-left to switch. Each spacecraft renders four sections — Identifiers, Cannonball model, Advanced geometry, and Danger Zone — in that order, with a real-time 3D viewer inside the Advanced geometry section.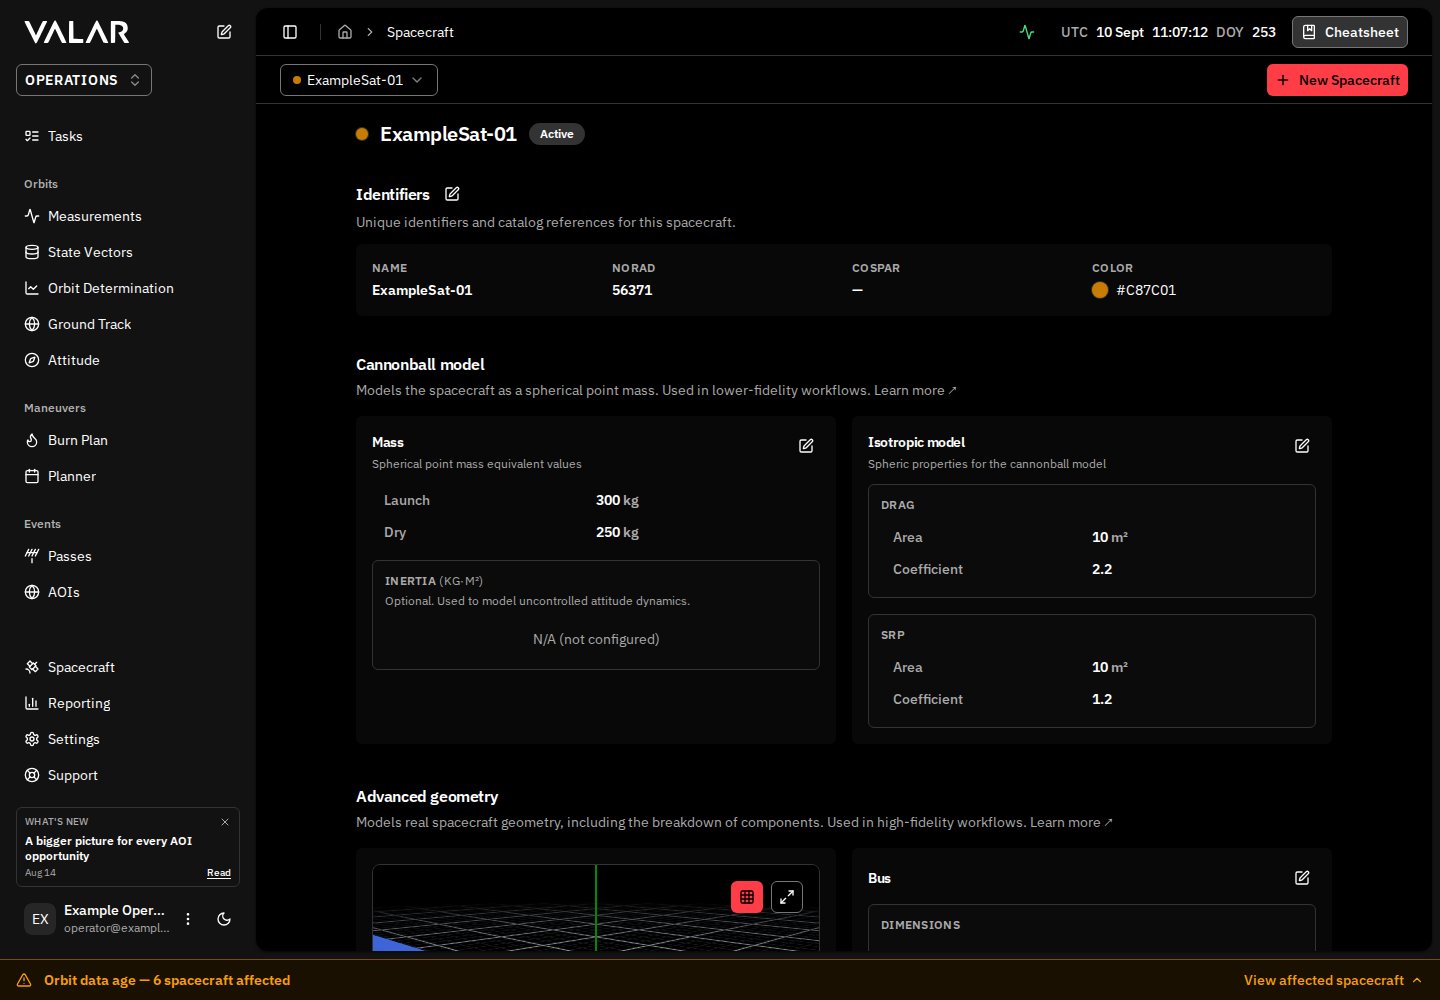
Page Header
The page opens with a compact header showing:- A colour dot — the same colour the rest of the app uses to identify this spacecraft on plots and lists.
- The spacecraft name.
- A status badge:
The header is read-only — lifecycle changes happen in the Danger Zone.
Switching Spacecraft
Use the dropdown in the top-left corner to switch between spacecraft. The dropdown is disabled while any card on the page is in edit mode — finish or cancel the edit first, then switch. This selector lists your full roster — both active and archived spacecraft — so the Spacecraft page is the one place you can still reach an archived craft. Selecting an archived spacecraft shows an Archived badge in the page header; open it to review its configuration or restore it.The Spacecraft page is the only place archived spacecraft remain selectable. Every other spacecraft picker and filter across the app — orbit determination, conjunctions, maneuver planning, ground track, reporting, plotting, and imports — lists active spacecraft only, in both the OPERATIONS and MISSION_ANALYSIS environments. When a picker has no active spacecraft to offer, it reads “No active spacecraft”.
Per-Card Editing
Each card on the page has its own Edit, Save, and Cancel controls. Entering edit mode on one card leaves every other card in read mode. While a save is in flight, the card’s button showsSaving... and its inputs are disabled until the save completes.
If a save fails, the card stays in edit mode with your draft intact so you can correct the value and retry. Cancel discards your draft and restores the last-saved values.
The Identifiers section uses a single Edit control for the catalogue association, display name and colour.
Identifiers Section
The Identifiers strip carries four fields:
Validation: A blank or whitespace-only Name shows the message
"Name is required." inline and blocks the save. New spacecraft also require a catalogue selection or an explicit not yet catalogued choice.
NORAD catalog number
The NORAD ID is the public catalogue number VALAR uses to fetch the spacecraft’s orbit. Select it through the catalogue lookup. For spacecraft without an assignment, choose This spacecraft is not yet catalogued. Legacy API integrations can continue supplying numeric identifiers directly. The accepted range is 1–999999; use the full number rather than an Alpha-5 representation such asB1234. Reserved analyst numbers (70000–99999) can remain on existing records but are not queried from CelesTrak.
Six-digit objects can use GP mean elements from CelesTrak or Space-Track through VALAR’s orbit workflows, even when the public orbit has no TLE text. TLE fitting and generation remain available subject to the export format’s catalog-number limits. Catalogue selection itself is possible even when no orbital elements are available.
External key
The external key is an optional identifier you assign to a spacecraft through the VALAR API, alongside its NORAD and COSPAR ids. It lets you reference a spacecraft by an identifier from your own systems — and, because you choose it, it works for a spacecraft that has no public catalog id yet. An external key is a string of 1 to 64 characters, using letters, digits, and the characters. _ : -.
Assigning the key. You can set the external key while it is unset — when you register the spacecraft or on a later update. Each key must be unique within your organization: if another spacecraft in your organization already holds that key, the assignment is rejected with a 409 conflict.
The key is immutable once set. Once a spacecraft has an external key, that key cannot change:
- Supplying the same value again is accepted and changes nothing.
- Supplying a different value, or clearing the key, is rejected with a 409 conflict (error code
SC-4094) — “The external key is immutable once set and cannot be changed or cleared.”
Assign the external key deliberately — you cannot change or remove it later. Choose a value from your own systems that will stay stable for the life of the spacecraft.
Cannonball Model Section
The Cannonball model is the default fidelity tier — bulk mass plus single drag and SRP area coefficients. The platform’s default propagation and conjunction stack uses these values for spacecraft without a full geometry. The section header includes a Learn more link to the First spacecraft tutorial. The section contains two cards side by side: a Mass card and an Isotropic model card.Mass card
The Mass card shows configuration only — current mass and propellant remaining are not displayed.
Inertia tensor display: the matrix renders the three moments on the diagonal and a muted
0 in every off-diagonal cell. When all three moments are unset the matrix collapses to a Inertia tensor not configured hint.
Inertia validation messages:
The card surfaces these messages inline and stays in edit mode until you correct or clear all three moments.
Isotropic model card
The Isotropic model card holds two self-contained blocks side by side — Drag and SRP:Drag area and SRP area are always operator-typed. The page does not prefill them from box or panel dimensions, even when those are configured.
Missing Required Inputs for Calculations
A saved spacecraft record is not proof that every calculation has the physical inputs it needs. If a calculation names a missing mass, area, coefficient, or geometry field, edit the corresponding card, supply the spacecraft’s actual value, save, and retry.- Numerical propagation requires a finite positive mass from the selected supported mass source. Dry mass is not a substitute for wet mass; a public TLE does not provide spacecraft mass.
- Enabled drag/SRP models require their actual area and coefficient inputs. A force explicitly disabled by the selected profile does not need unused inputs. VALAR does not infer one area from another or manufacture a box from a scalar cross-section.
- Faceted calculations require the selected body’s dimensions and surface optics, plus the configured panels they consume. Complete those fields in Advanced geometry.
- Propellant-budget calculations also need dry mass and a physically consistent wet/dry mass split; configure the selected thruster’s positive thrust and Isp for burn calculations.
Advanced Geometry Section
The Advanced geometry section is the high-fidelity tier — bus dimensions, panel definition, and mounted components. It’s used by the faceted radiation model and attitude-aware perturbations. The section header includes a Learn more link to the First spacecraft tutorial. The section lays out a Bus card beside the 3D viewer, with a tabbed components area below.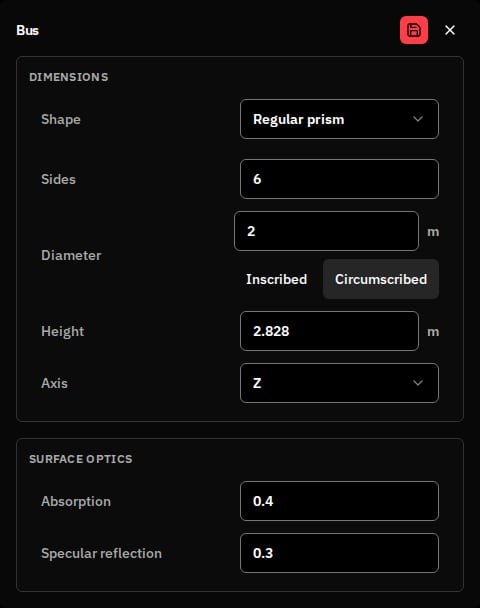
Bus card
A Shape selector at the top of the Bus card chooses the bus body shape — Box or Regular prism — and the dimension inputs below it change to match. You define the whole bus from this single card. A Box bus exposes three dimension fields:
A Regular prism bus replaces the box fields with the polygon-prism inputs:
In read mode the diameter is shown with its measure, for example
1.0 m (Inscribed). Switching the Shape clears the dimension inputs entered for the previous shape.
The card also holds Surface optics beside the dimensions:
Surface optics describe the per-facet optical coefficients consumed by the faceted radiation model when an attitude profile is configured. When no attitude profile is configured, the Bus card shows the inline note “faceted forces apply once an attitude profile is configured” for both box and regular-prism shapes, and the spacecraft remains on the isotropic model — using only the scalar Drag coefficient and Coefficient values from the Isotropic model card.
3D Viewer
The right side of the Advanced geometry section displays a real-time 3D model of the spacecraft:- Renders the bus in its true shape — a box for a Box spacecraft, or the configured polygon prism for a Regular prism spacecraft.
- Draws each configured panel as a flat plate at its mount position, oriented so its broad face points along its facing, and sized to its length and width — so the model reflects the true arrangement of the panels.
- Updates automatically as you save box, prism, panel, or thruster changes.
- Rotate the view by clicking and dragging.
- Zoom with the scroll wheel.
- Shows accurate proportions based on configured dimensions.
Components Tabs
Below the Bus + viewer row, the Panels, Thrusters, and Payloads tabs hold the mounted components. Each tab trigger shows an item-count badge.Panels tab
The Panels tab holds the spacecraft’s solar and radiator panels. Each panel is configured independently as its own card — mount point, orientation, size, and optics are set per panel, not shared across a fixed arrangement. The tab trigger badge shows the number of configured panels.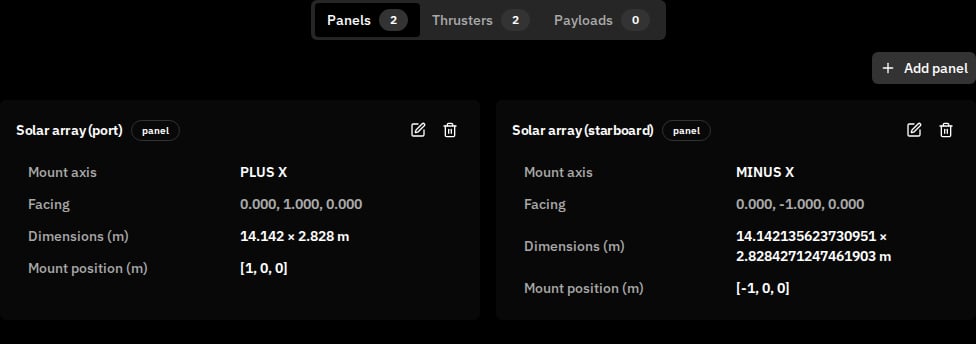
No panels configured prompt with a single Add panel button.
Each panel card carries:
Mount axis selector — choose one of seven options:
Validation — a panel saves only when every field is valid:
While a custom mount axis is invalid the Facing readout shows
— and the panel cannot be saved.
A spacecraft that had a solar-panel array configured before independent panels were introduced is converted automatically: the former array becomes two symmetric panels — Solar array (port) and Solar array (starboard) — that reproduce the original array’s drag and SRP exactly. No action is required; you can refine, rename, or remove them like any other panel. (A spacecraft that had no panel array simply starts with none.)
Panel facing drives drag and SRP forces only once an attitude profile is configured. Until then, panels save and display normally, but the spacecraft stays on the isotropic model — using the scalar Drag coefficient and Coefficient from the Isotropic model card.
Thrusters tab
The Thrusters tab lists every thruster mounted on the spacecraft. Click Add thruster to open the thruster dialog, or edit and delete existing thrusters from the list.
Deleting a thruster prompts a confirmation before applying.
Payloads tab
The Payloads tab lists every payload mounted on the spacecraft. A payload is an on-board sensor — a body-frame boresight axis plus a field of view describing the cone of sky it sees. Unlike the thruster dialog, payloads are added and edited inline: click Add payload to append a new payload card, fill it in place, and Save it. Each card has its own Edit, Save, and Cancel controls, and a delete control that prompts for confirmation before applying. When the spacecraft has no payloads yet, the tab shows aNo payloads configured prompt with a single Add payload button.
Each payload card carries:
Field-of-view fields by shape — every angle is a half-angle measured from the boresight to the edge of the field of view:
Payload optics. The Pixel pitch (
µm) and Focal length (mm) fields sit beside the field-of-view geometry and describe the imaging optics. Both are optional — a payload saves and stays fully valid with neither set, and they do not affect the field of view or access geometry. Set both together to model an opportunity’s ground sample distance (GSD): with both present, VALAR reports the modelled GSD on the AOI overflight opportunities page; with only one or neither set, that opportunity’s GSD reading stays unavailable. Enter, edit, or clear either value like any other field — each takes a positive number, and clearing a value (leaving it blank) removes it, returning the opportunity’s GSD reading to its unavailable state.
Off-nadir limits. The Along-track off-nadir limit and Cross-track off-nadir limit fields sit beside the field-of-view geometry and describe how far the payload may be pointed away from nadir — along-track fore or aft along the ground track, cross-track left or right across it. Both are optional and independent — a payload may carry one without the other, or neither. Each angle is measured at the spacecraft, from the direction to Earth’s centre; an operator holding a ground-side incidence angle must convert it to this spacecraft-frame angle before entering it. When set, a limit must be greater than 0 and at most 90 degrees — 0 is rejected rather than treated as “no limit”, so leave a field empty to leave that axis unconstrained. With both fields left empty, pass forecasts for this payload assume nadir pointing only. Both the Along-track off-nadir limit and the Cross-track off-nadir limit drive real access: on any area of interest with off-nadir opportunities turned on, setting, editing, or clearing either one is reflected in that area of interest’s opportunities within a few minutes — no other step required.
A spacecraft holds up to 8 payloads. Once eight are configured, the Add payload button is disabled and hovering it shows a Maximum 8 payloads tooltip.
Each payload’s field of view is drawn live in the 3D viewer as a translucent solid: oriented along its boresight axis, with its apex at the attachment position. A 90° conical field of view renders as a hemisphere.
A payload is an on-board sensor carried by the spacecraft — it points along a body-frame axis and moves with the spacecraft. Do not confuse it with a tracking sensor, which is a fixed ground-based observer that watches spacecraft from the surface.
Danger Zone
The Danger Zone is the final section on the page and hosts the two lifecycle actions — Archive and Restore:
Every action opens a confirmation dialog before applying, and the configuration cards stay editable for an archived spacecraft — archiving does not lock them. The behavior is identical across the OPERATIONS and MISSION_ANALYSIS environments.
Archive is reversible; delete is not. Archiving hides a spacecraft and preserves its data, and you can bring it back with Restore. Deleting an archived spacecraft permanently destroys it and all of its data — there is no undo and no recovery. Delete appears only for operators who hold the separately-granted delete authority; if you do not see it, you do not hold it. See Delete a spacecraft for the full flow.
Archiving a spacecraft
Click Archive on an active spacecraft. A dialog titled Archive spacecraft asks you to confirm — “This will archive [name]. You can restore it later.” — and archiving removes it from every picker and active list while preserving its data and history. If the spacecraft has scheduled tasks (fetch-alerts or orbit-determination tasks), archiving permanently deletes them, so the dialog advances to a second confirmation before removing anything: A spacecraft with no scheduled tasks skips the second step — the single Archive spacecraft confirmation archives it directly, with no deletion warning. A task that targets multiple spacecraft is not deleted outright: only the archived spacecraft is removed from it, and the task keeps running for its remaining spacecraft. It is deleted only when the archived spacecraft was its last one.Restoring a spacecraft
Select the archived spacecraft from the top-left selector — it still lists archived craft — and click Restore in its Danger Zone. A dialog titled Restore spacecraft asks you to confirm — “This will restore [name] and mark it Active.” Restoring returns the spacecraft to Active: it re-enters every picker and list, and AOI-overflight and degraded-mode generation resume automatically.Restoring does not re-create the scheduled tasks that were deleted when the spacecraft was archived. After a restore you’ll see the notice “Scheduled tasks removed on archive were not restored. Re-create any you need.” — re-create any fetch-alerts or orbit-determination tasks you still want, including the fetch-alerts task that drives conjunction alerts.
Where an archived spacecraft appears
Archiving hides a spacecraft as a selectable option everywhere except this Spacecraft page — it does not remove the spacecraft’s historical records.Alerts after archiving
An archived spacecraft generates no new alerts, but the alert sources stop — and resume — differently:Alerts generated before a spacecraft was archived remain visible — archiving suppresses future generation, it does not erase history.
Validation Feedback
As you edit any card, each input shows inline feedback below it. The feedback uses four states:
Per-field validation messages carried across the page:
Creating a New Spacecraft
Click New Spacecraft in the top-bar to navigate to the/spacecraft/new creation page. The page mirrors the detail-page layout — the same Identifiers, Cannonball model, and Advanced geometry sections — but starts with empty values and every card already in edit mode. Required fields are marked with an asterisk. A page-level Create Spacecraft button at the bottom of the page submits the form; Cancel returns to the spacecraft list without saving.
Supply physical coefficients from your spacecraft configuration. A displayed example or prior value is not evidence of a missing spacecraft property; do not rely on generic drag or reflectivity coefficients to make a calculation run. Colour is a display preference, independent of the physical model.
Required-field validation runs through the same Validation Feedback surface as the detail page — submitting the form with a blank required field shows the per-field error inline (for example,
Name is required.) and blocks the submit until every required field is filled. Each offending field shows its inline message — for example, Absorption coefficient (α) is required on the Advanced geometry section — and the page scrolls the first field with an error into view, so a blocked submit never hides its cause below the fold. The Danger Zone does NOT appear on the creation page; archive and restore only apply to spacecraft that already exist.
On success the page shows a confirmation toast and navigates to the new spacecraft’s detail page so you can complete the remaining configuration — inertia tensor, additional surface optics, panels, and thrusters.
Related Pages
- Creating Your First Spacecraft: Step-by-step walkthrough for new users — also the destination of the Learn more link from the Cannonball model and Advanced geometry section headers.
- Force Model: How geometry and optical inputs drive attitude-dependent drag and SRP.
- Attitude Overview: Configure an attitude profile so the platform uses per-facet drag and SRP based on the Bus surface optics and panel definitions.
- Burn Plan: Plan maneuvers using configured thrusters.
- State Vectors: View orbit solutions for this spacecraft.
- Task Automation: Schedule the fetch-alerts and orbit-determination tasks that archiving deletes and a restore does not re-create.