
/passes/stations
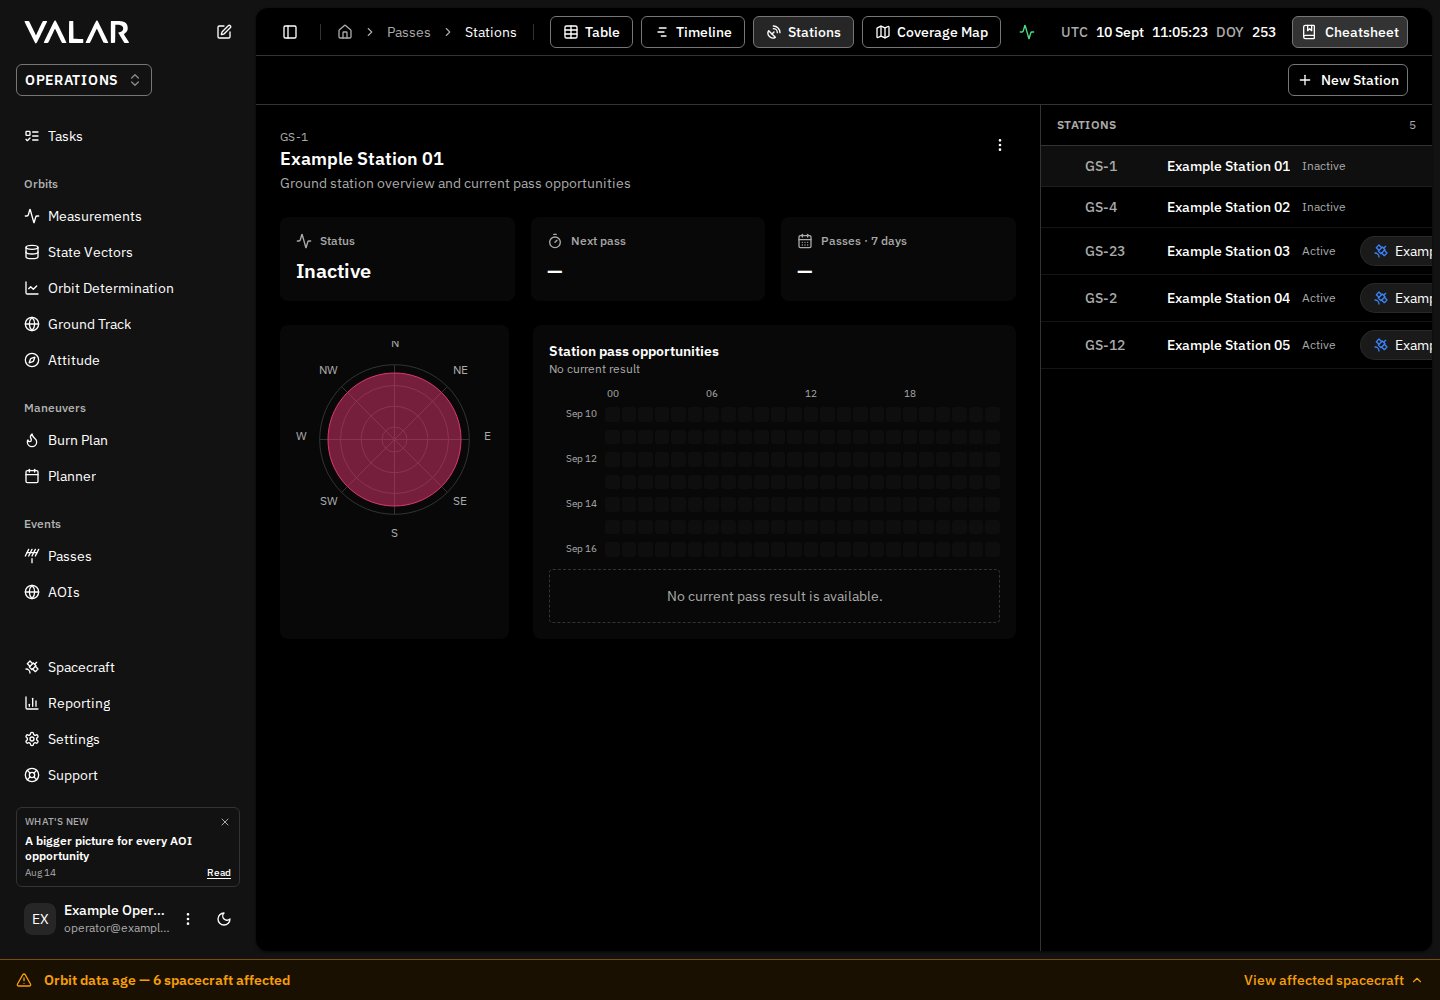
For the complete documentation index, see llms.txt.Open the page via the Stations tab in the Passes area’s tab bar, alongside the Table, Timeline, and Coverage Map tabs.
Page Layout
Optional RF-band and direction labels
When optional mask labels are available to your account, open Edit Station or Edit masks, choose a mask, and enter RF bands (optional). Separate custom labels with commas, for exampleS, X. Link direction (optional) accepts
Uplink, Downlink, Both, or Unspecified. You can leave either field
empty or clear it later. The same controls are available in Mission Analysis’s
station editor. Provider-owned masks remain read-only.
Labels appear beside mask names in station details and calculation selectors.
You still choose the mask explicitly; a label does not change visibility
calculations or establish RF or regulatory suitability. Existing masks work without
labels. Results retain the classification saved with their calculation, so later
station edits do not relabel past work. Previously calculated results may have no
classification. Seasonal validity is not inferred from these labels.
Station Status and Pass Summary
Beneath the selected station’s name, a row of summary cards recaps the station at a glance:
The Status card is always present. The Next pass and seven-day count cards appear together with the station pass opportunities panel, and show a loading placeholder while their summary is being fetched. Several contact windows can belong to one overflight, so these counts are not interchangeable.
Active and Inactive Stations
Every station is either Active or Inactive. The station’s Status card states which, and each row in the station list carries the same word — the state is always written out, never indicated by color alone. Active stations take part in pass computation as normal. An inactive station stays listed and selectable; it only stops contributing new pass work, so no new passes are computed for it. Passes it already has remain in place, and you can still select the station, edit it, and review its recorded passes. Deactivation is not deletion, and it asks for no confirmation. To deactivate a station, select it, open its kebab menu (⋮), and choose Deactivate station. The menu item reads Deactivating… while the change is in flight. Once the station is inactive, the same menu offers Activate station, which restores full participation in pass computation — no other changes are needed.Importing KSAT antennas
For workspaces with KSAT enabled, an administrator can open Settings → Integrations and configure the KSAT account. Where the modal setup is available, choose Connect or Manage, select Test or Production, and verify a service API key. Map your VALAR spacecraft to their KSAT counterparts; Add spacecraft mapping lets you configure several mappings before saving, including inactive or archived VALAR spacecraft. Choose antennas from the list grouped by site, then save the mappings and antenna selection. A new account starts with no antennas selected. Select all is optional; saving an empty selection imports no stations. All mappings for the same KSAT account share the selected antennas. If a later mapping fails to save, the modal identifies how many succeeded so you can review and retry the remainder. Newly imported antennas appear as Inactive stations. VALAR retains KSAT’s receive and transmit elevation masks separately; provider geometry and orbit readiness must be qualified before operational use. Importing or mapping an archived spacecraft does not activate it or establish booking readiness. Use Manage to review mappings and readiness or to disconnect. Disconnecting keeps station identities and history; disconnecting the account or its last spacecraft removes the saved key and deactivates imported antennas. Existing reservations remain in KSAT. Reconnect retained mappings by verifying the account and selecting the spacecraft to reconnect. Closing setup discards unsaved credentials and choices.Inspecting a Station Opportunity
When a selected station has pass opportunities, the Station pass opportunities panel appears beside the antenna constraints. It shows a seven-day heatmap divided into 24-hour columns. An empty hour is labelled No opportunities in this hour. when the current result is known; if no current result exists, it is labelled No current pass result is available. When the result covers several spacecraft, the panel header carries an AGGREGATE badge, with a coverage line beneath it. The line reads N of M spacecraft covered — for example, 2 of 3 spacecraft covered — followed by · missing: and the names of any spacecraft without opportunities, or · complete coverage when every requested spacecraft is covered. An empty panel distinguishes why it is empty. A genuinely empty seven-day window reads No pass opportunities in this seven-day window. When some covered spacecraft returned no opportunities, it reads No pass opportunities returned for the covered spacecraft; this result is incomplete. When the underlying spacecraft data is stale or the result is degraded, it reads Opportunities are unavailable because the spacecraft data is stale; refresh and retry. or Opportunities are limited because the current result is degraded; refresh and retry., with a Refresh button — a stale or degraded result is not the same as an empty window. Click a populated hour to select that time bucket. The page shows a compact list of the passes in that hour. Each pass includes its UTC acquisition time, spacecraft name, and CANDIDATE or BOOKED disposition. Click a pass to open its read-only pass geometry below the station overview. The opportunity panel can also show the current result’s state:Pass Geometry Inspector
After you select an opportunity, the Pass geometry section appears below the station overview. It reads Predicted geometry for the selected station opportunity and keeps every panel tied to the same selected prediction epoch.
The selected epoch is synchronized across the map marker, both profiles, and the playback control. All displayed epochs and times use UTC.
Pass Geometry States
The inspector keeps loading, valid empty, restricted, invalid, and unavailable results distinct. It never shows partial track data or raw error details.
When a displayed result is stale or degraded, the Provenance dialog shows the corresponding STALE or DEGRADED badge and the message Geometry is informational and non-authoritative until the current result is refreshed. Treat that geometry as review context rather than current authoritative coverage.
For a legacy station with unrestricted azimuth and an unknown elevation mask, the coverage card shows a Mask unknown badge instead of a bounded-coverage figure — the inspector does not display a precise footprint for this state.
Viewing a Station’s Applied Horizon
Selecting a station shows its applied horizon in the overview — the composed curve pass computation actually uses, alongside the raw survey behind it and your configured minimum elevation as a reference line. See Elevation Masks for how these combine. The applied-horizon panel is rolling out gradually — until it reaches your account, the station overview shows the coverage chart without the rows described below.
Beneath the chart, two rows describe the horizon in force:
Unspecified does not mean something is wrong with the station. It means the station was configured before VALAR began recording where a horizon comes from, so its provenance was never captured — not that a survey is missing or that the platform is guessing.
Creating or Editing a Ground Station
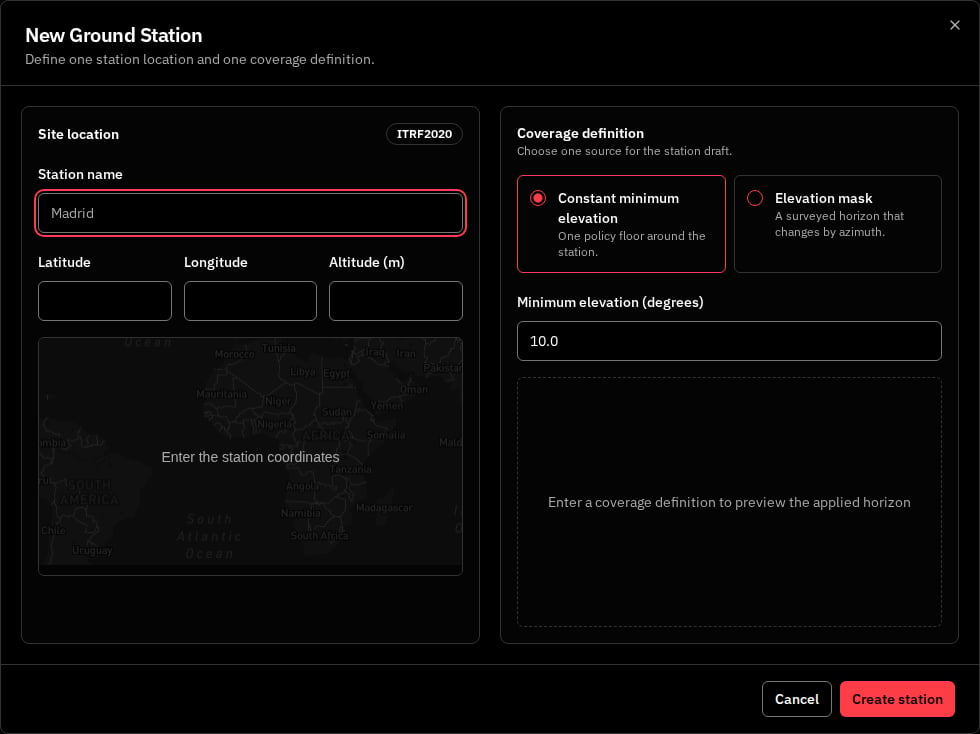
Site Location
Below the coordinate fields is a compact 16:9 minimap that places a marker at the entered latitude and longitude as soon as both are valid. It is a location check only — it confirms the point on the globe you meant, not terrain suitability, antenna readiness, or coverage.
Coverage Definition
The two coverage forms are alternatives, not two limits you combine — choose the one that describes this station’s horizon and the modal shows only the fields that choice needs.
Switching between the two clears whatever you had entered for the other — a mask you uploaded does not reappear if you switch back to it after selecting constant minimum elevation, and vice versa.
Constant Minimum Elevation
Enter a single Minimum elevation (degrees) value between0 and 90. A new station starts at 10.0 degrees by default.
Elevation Mask (CSV Upload)
Choose a CSV file under Elevation mask CSV. Each row is oneazimuth,elevation pair:
Each row applies from its azimuth boundary until the next boundary — a row does not describe a single point, it describes an interval. For example,
0,10 followed by 90,15 means 10 degrees applies from azimuth 0 up to (but not including) 90 degrees, where the 15-degree value takes over. The final interval wraps around from 360 degrees back to 0 degrees, so the last row’s value also covers the gap back to the first row’s azimuth.
If a row fails validation, the upload is rejected with a message naming the offending row or azimuth, and whatever mask you had previously uploaded successfully stays in place — a bad file never clears a good one. Activating the upload without choosing a file first shows Choose a CSV before it can be previewed.
Applied Horizon Preview
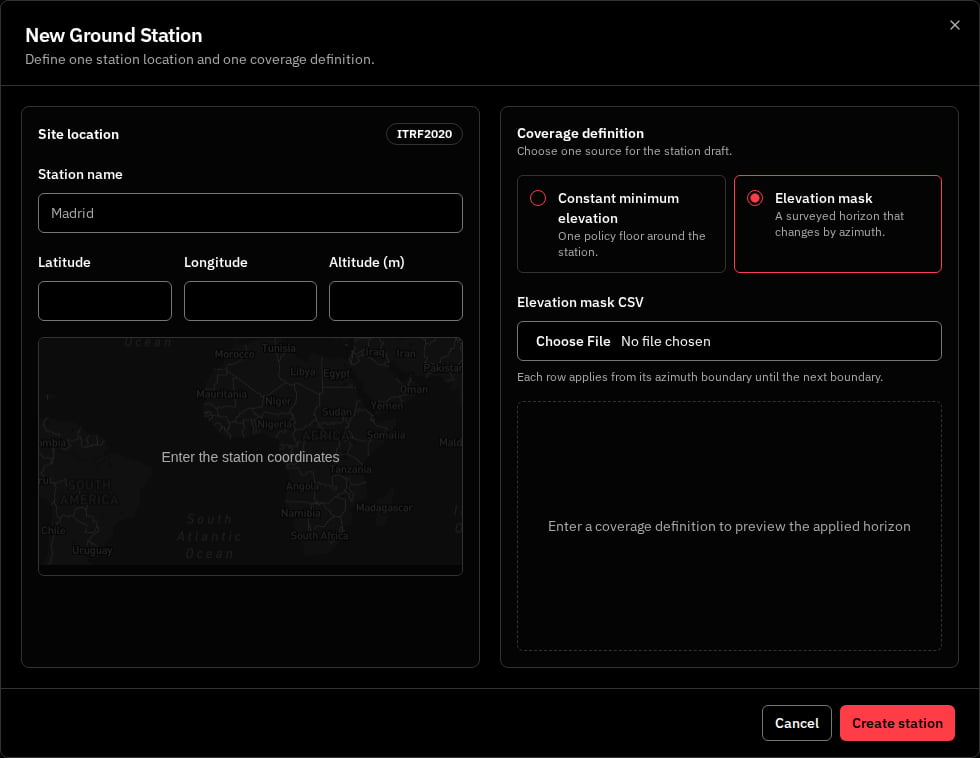
The minimum elevation value carries over as a floor beneath an elevation mask too: for any azimuth where the mask specifies a lower elevation than the current minimum-elevation value, the higher of the two is what the preview (and the saved station) actually applies. If you intend a mask value to take effect exactly as surveyed, make sure the minimum elevation is set at or below it.
Validation
Every field is checked as you type; a required field only shows as missing after you attempt to save.
If saving fails after every field validates, the modal stays open, every value you entered is preserved, and a banner explains what went wrong so you can retry without re-entering anything.
Click Cancel to close without saving, or Create station (Save changes when editing) to save. The button reads Saving… while the request is in flight.
Editing or Deleting a Station
Select a station in the list, open its kebab menu (⋮), and choose Edit Station to reopen the same modal pre-filled with that station’s values, or Delete Station to remove it. The same menu also offers Deactivate station (or Activate station on an inactive station) — see Active and Inactive Stations. Deleting asks you to confirm first — Are you sure you want to delete <station name>? This action cannot be undone.Related Pages
- Passes Overview — the Passes area’s landing page and a map of where each Passes page fits.
- Elevation Masks — what a station’s elevation mask is and how it combines with its minimum elevation.
- Sensors — managing the tracking sensor configurations alongside your ground stations.
- Timeline — what each station’s outcome on the timeline means, including what to do about it.
- Coverage Map — a read-only geographic view of every station’s coverage footprint at a shared reference altitude.